Serving Eastern Pennsylvania, Central and Southern New Jersey, and Delaware
Serving Eastern Pennsylvania, Central and Southern New Jersey, and Delaware
As an organizer it is my job to help my clients sort through belongings and ask themselves tough questions, like:
A lot of times the answers are that they have a) never used it, b) used it once, c) it was given to them and they never liked it, or d) I have 3 things that perform the same function. These answers usually mean the object needs to go. For the things my clients are struggling to let go of and think they may need “some day” I tell them to “USE IT OR LOSE IT”!
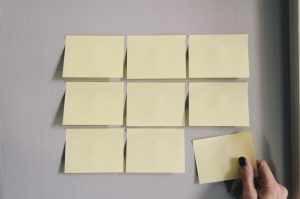
If you don’t USE IT your gonna LOSE IT (donate it). Once we agree that an item fits into the “USE IT OR LOSE IT” category we need to assess it and give it an expiration date. We physically assign a date by writing it on a post-it and slapping it on the item. Then we put that item somewhere it is easily accessible so that it has every opportunity to be used. For example, if you think you absolutely must keep your 1980s hair crimper we will put it on the bathroom counter so after 30 days if you haven’t used it, when it was right in front of you, then you never will and it goes into the donate pile.
Some things to think about when assigning an expiration date are:
Something that was very expensive gets a longer expiration date than something very cheap. Something you’ve had for 10 years and used once gets a much shorter deadline than something you’ve only had six months. Something large gets a shorter deadline than something small.
Sometimes these lines are blurred because things can fit into multiple categories. A ping-pong table takes up a lot of space but it may be worth a lot of money. This is when you need to reflect on what your individual priorities are. Do you value the space in your home over the money spent or the money you could get to sell it? Each individual has different priorities and that is okay, you need to come up with a timeline that feels right to you.
If you say that you are giving yourself 3 months to play ping pong and that date comes and goes you need to stick to your expiration date and let the item go. Accountability is key!
September is well under way which means the kids are back to school and its time to get ready for fall. Part of being a NAPO Organizer is helping our clients be prepared for the crazy predicaments life throws our way. I have compiled this comprehensive list to give you a jump start on fall home maintenance so that you and your family have more time for apple picking and pumpkin carving!
1. Wash exterior windows.
2. Clean gutters and down spouts.
- HACK: Try using a plastic spatula; it fits perfectly, won’t scratch gutters and is easy to clean.
- While your up there look for loose shingles and debris. HACK: binoculars help magnify loose shingles.
3. Sweep off front porch and put away summer décor: Don’t forget cushions, outdoor furniture, kid’s sprinklers and kiddie pools.
4. Create or reorganize space in the garage for summer tools & toys.
5. Put out new fall mat and add fall décor.
6. Clean, cover and store grill.
7. Water your lawn. You may think it’s time to put the sprinklers away but watering your lawn in the fall is actually a great way to help it recover from the stress of the summer sun and strengthen it for winter.
- If you fertilize your lawn in the fall it will need the H2O to help it soak up the nutrients.
- In a few weeks you can drain garden hoses and shut off water supply to spigots.
- Additionally, fall is the perfect time to aerate soil.
- It relieves compaction and allows air, water and nutrients to penetrate your lawn.
8. Order firewood or get choppin!
9. Get your chimney cleaned and inspected.
10. Winterize air conditioning unit or remove and store window units. Bring out the space heaters.
- To properly store your window units you will need to clean it first. After its been cleaned, remove the filter and with a soft brush clean it with warm, soapy water then rinse and allow it to air dry. Do a visual inspection of the filter and if the cleaning didn’t do the trick, then you should replace it. Once it’s dry, place the clean filter back in the air conditioner. Place the unit in its original box or a plastic storage tote.
- Store in a warm, dry place.
11. Check weather stripping on doors and caulk around windows.
- In a few more weeks it will be time to winterize.
- Check with your township or local community center to see if they are distributing free winterizing/energy-saving kits.
12. Dust fans, light fixtures and reverse direction of ceiling fans. Running fans in the cooler months can actually save on heating costs! Fans have slightly angled blades that when turning counterclockwise move air down. Warm air naturally rises so by switching the rotation of your ceiling fan it pushes the warm air down. Most fans have a small switch to reverse the direction.
Clockwise = Winter Counterclockwise = Summer
13. Vacuum couch cushions, collect change and lost snacks and display some cozy throws blankets.
14. Give your oven a thorough clean inside & out as well as BEHIND it to get it ready for the holiday cooking season.
15. Pack summer clothes and bedding; wash and store.
- Consider keeping swimsuits and towels handy in case you plan a winter vacation.
- Pull winter clothes, flannels and heated blankets from storage and air them out.
16. Check car for shovel, ice scraper, blanket and refill or create an emergency kit
- Read my NAPO blog “An Organized Car for 2017” for tips on what you need in your car https://www.napo-gpc.org/2017/01/an-organized-car-for-2017
 Professional Organizers have tips to streamline your daily activities and food prep in the kitchen.
Going a step farther, I wanted a few tips from a professional chef. Chefs know how to prepare beautiful and safe food. Cross-contamination and improper temperatures can mean the difference between life and death.
Chef Michael Sultan of Revolution Taco gave me four simple tips:
We know professional organizers love label makers; labeling food is an easy way to ensure you’re not eating expired food. When the health department goes into a commercial kitchen, one of the first things they look for are labels with dates. So why aren’t we doing this at home? Labeling is as simple as using masking tape and a Sharpie. When you return from the grocery store, write the date on your purchases. After making dinner, label leftovers with the name of the dish and date before putting in the fridge or freezer.
Once things are labeled properly, it will be easy to follow the “first in, first out” rule. First thing in the fridge should be the first thing out of the fridge.
If you pay attention to dates and plan meals accordingly, you will save food, money and space.
Everyone has food staples they stock in the fridge. Mine are garlic, onions, rice and tons of hot sauces. Others may have eggs, milk, lunch meat, cheese and yogurt. Whatever yours are, it can be helpful to keep an inventory sheet of must-have items. Restaurant owner, Mike explained, his menu generally stays the same aside from specials. He keeps an inventory of things he always needs on hand so any employee can order food.
Mike recommends typing and laminating the inventory, and posting it on the fridge. Keep a dry erase marker handy to mark your laminated Inventory Sheet. When someone uses the last drops of milk in their coffee, they can put a checkmark next to ‘milk.’ That way, whomever does the shopping knows what to get. Leave space at the bottom to add extra items, take a photo of your Inventory Sheet before running to the store and you’ll have a foolproof shopping list!
Proper food storage is crucial to avoid cross-contamination and foodborne illness. If you only take away one thing from this post, remember to store raw meat at the bottom of the fridge. To prolong freshness, make sure raw meat is tightly sealed with as little air inside as possible. If you aren’t sure how tight the seal is, put it on a plate to avoid dripping and therefore contaminating other surfaces or food. Label and date packages so there is no guesswork on freshness.
I confess – the chef I interviewed is my boyfriend, Mike. Before I adopted some of his foodie chef habits, my fridge was the place food went to die. Now I have a clean, spacious fridge and save money because I am not tossing food I forgot to eat in time.
If you use these four chef-approved tips, you too can have a safe and streamlined kitchen!
 It’s January again, which means New Year’s resolutions and packing away holiday decorations. January is also considered ‘GO Month’ aka Get Organized Month in the world of organization. We all set new goals of what we would like to achieve, but what if this year we focus on one location where we spend more time than we think; our cars. According to the AAA Foundation for Traffic Safety, Americans spend, on average, over 290 hours in our car EACH YEAR. If I’m going to spend the equivalent of seven work weeks driving my car each year, I want to make sure I am comfortable and prepared. Organizing your car is an accomplishable goal that will enhance your everyday life and can be achieved in an afternoon. Below are a few easy steps to follow on cleaning out your car and what supplies you need for safety and convenience.
Step One
Clear everything out of your car…and I mean every penny and empty coffee mug! Sort everything into three piles; ‘Toss’, ‘Put Away’, and ‘Keep in Car’. The ‘Toss’ pile is all the junk you want to throw away; wrappers, receipts, bottles, etc. The ‘Put Away’ pile might mean it goes in the house, back to the office or needs to be returned to a friend. The ‘Keep in Car’ pile is everything that belongs in your car. Cross-reference the list below to decide what stays and what goes.
Step Two
Clean the car inside and out. Start by vacuuming from the top down, including the upholstered ceiling since dust builds up on soft surfaces. Don’t forget to remove any floor pads and vacuum under them and the pads themselves. Next, dust all of the hard surfaces and wipe down the windows. I use Swiffer dusting wipes and I usually buy the generic brand at the local dollar store, they work great! After dusting, I use ArmorAll Original Protectant Wipes ($10.79 for a 3 pack at Target) on all of the hard surfaces and glass wipes for the windows and windshield. You can also use a damp rag or any other car interior polish you’d like. For really dirty jobs you may want to consider shampooing your upholstery.
I like to do this stage at my local self-service car wash. This way, I don’t have to worry about lugging a vacuum in and out of the house or hooking up the hose. I keep the interior wipes along with some window wipes in my car at all times so I can just roll up and pay a few dollars for their vacuum and then wash the exterior and be on my way.
Step Three
Now we address our three piles. First, throw away anything labeled ‘Toss’. That was easy! Next, anything that was deemed ‘Put Away’ should be contained in a box or a bag and immediately brought inside. If your like me and decided to clean the car off site, make sure everything is contained to be brought inside and put away. Now it is time to put the ‘Keep in Car’ pile away. Below, I have provided a list of what every car owner needs and added notes and suggestions on how to use each item and where they are best stored.
Car Essentials
SAFETY – Almost all of this can be kept in the trunk
CONVENIENCE ITEMS
Follow these three easy steps and you’ll be ready to plan your 2017 road trip! Happy New Year!
Click on the above title to learn more about the featured author


